文章来源:
来自 Sprinter-Forum 论坛用户 KrellyKryl 使用 ALLScanner VCX-SE 的产品深度体验和教程
https://sprinter-source.com/forums/index.php?threads/129177/
I have been wanting to set up a proper diagnostic and variant coding system for my 2022 4x4 with the V6 Diesel engine over the last several months. I was new to the Sprinter/Mercedes platform, so I basically started from scratch - and, oh boy, has it been an adventure. By now, however, I have been able to get everything running regularly and can now use Xentry to diagnose my van, clear codes, see underlying data, and more. Further, I'm also able to do basic coding in DTS Monaco and given that training material in English is really lacking, I wanted to do a write-up that outlines what I did to get things working.
过去几个月,我一直想为我的 2022 款 V6 柴油四驱皮卡安装一套合适的诊断和变体编码系统。我之前对 Sprinter/Mercedes 平台还不熟悉,所以基本上是从零开始——天哪,这真是一次冒险。不过,现在我已经能够让一切正常运行,并且可以使用 Xentry 诊断我的货车、清除代码、查看底层数据等等。此外,我还能在 DTS Monaco 中进行基本的编码。考虑到英语培训材料非常缺乏,我想写一篇文章,概述一下我是如何让这一切顺利进行的。
¶ Disclaimer 免责声明
Please note that this is not a comprehensive guide, nor do I consider myself an expert on any of this - it's simply a write-up of what has worked for me. If you do end up going down the same route, please note that using things like DTS Monaco has the risk of screwing up your car. So please don't blame me if your nice van goes up in flames 😉. I cannot guarantee that the information contained herein is completely without error or omission. Therefore, I accept no liability for any errors or omissions, or for the results obtained from the use of this information. Furthermore, the use of unlicensed software in conjunction with the instructions or hardware provided herein is the sole responsibility of the user to ensure that they comply with all licensing agreements and laws governing the use of such software.
请注意,这不是一份全面的指南,我也不认为自己是这方面的专家——这只是对我有用方法的总结。如果您最终也走上了这条路,请注意使用 DTS Monaco 之类的工具可能会损坏您的爱车。所以,如果您的好面包车起火了,请不要怪我😉。我无法保证本文包含的信息完全没有错误或遗漏。因此,对于任何错误、遗漏或因使用本文信息而导致的结果,我概不负责。此外,如果将未经授权的软件与本文提供的说明或硬件结合使用,用户应自行负责确保其遵守所有许可协议和管辖此类软件使用的法律。
¶ Overview of the Mercedes diagnostic/coding ecosystem
¶ 梅赛德斯诊断/编码生态系统概述
Xentry, Monaco, StarFinder, SDmedia, Vediamo, WIS, EPC, DAS, STAR, C4, C5, C6, and on and on it goes ad infinitum. There are so many acronyms associated with the Mercedes ecosystem that I honestly didn't even know where to start. Thing is, though, if you have a newer model (which is what I'll focus on - I don't know how this stuff works in older vans), you can ignore many of these. Below is a brief overview of the main software you need to know more about:
Xentry、Monaco、StarFinder、SDmedia、Vediamo、WIS、EPC、DAS、STAR、C4、C5、C6,等等,数不胜数。与梅赛德斯生态系统相关的缩写词太多了,说实话我都不知道从何说起。不过,如果你的车是新款(我接下来会重点介绍——我不知道这些东西在老款厢式货车上是如何运作的),你可以忽略其中的很多缩写。以下是你需要了解的主要软件的简要概述:
¶ Mercedes Star Diagnostic Tool (STAR)
This is the larger package as it comes to the entire diagnostic and programming system used by Mercedes-Benz for vehicle servicing, maintenance, and repairs. You don't really need to worry about the details, but the main thing to consider here is that it comes in different versions and the two you should consider is "Connect" C4 or C6. Most people seem to prefer C4, but IMO, don't overthink this and most people can probably ignore it. For a longer overview: https://techroute66.com/mercedes-star-diagnostic-tool/.
这是梅赛德斯-奔驰用于车辆保养、维护和维修的整套诊断和编程系统,是其中规模最大的一个。您无需担心细节,但主要需要考虑的是它有多个版本,您应该考虑的是“Connect” C4 或 C6。大多数人似乎更喜欢 C4,但在我看来,不要想太多,大多数人可能都会忽略它。更详细的概述请访问: https://techroute66.com/mercedes-star-diagnostic-tool/ 。
¶ Xentry (and DAS U& HHT)
This is the main tool for diagnosing your car, read and clear error codes, read out raw values from the various ECUs, make adaptations, initialize new sensors, etc. If you're currently using an OBD2 diagnostic tool for reading and clearing codes, Xentry will take it to the next level and IMO, is worth getting over (otherwise perfectly fine) devices from Foxwell, ThinkDiag, and others, if you're serious about your van. DAS is the older version of the diagnostic software that you likely don't need to consider (you might also come across “HHT” - another ignore).
这是诊断车辆、读取和清除错误代码、从各个 ECU 读取原始值、进行调整、初始化新传感器等的主要工具。如果您目前正在使用 OBD2 诊断工具读取和清除代码,Xentry 将使其更上一层楼。在我看来,如果您认真对待您的车辆,Xentry 值得您选择,而不是像 Foxwell、ThinkDiag 和其他公司那样(其他方面都很好)的设备。DAS 是诊断软件的旧版本,您可能不需要考虑(您可能还会遇到“HHT”——另一个需要忽略的版本)。
¶ DTS Monaco (and Vediamo) DTS Monaco(和 Vediamo)
This is the main tool for variant coding / engineering of your van (DTS = Diagnostic and Test System... 🙄). Want to turn off lane keep assist? DTS can do that. Want to add a balance function to your audio? DTS can do that. Run cameras at any speed? You got it, DTS. And so much more. It can also diagnose and clear codes like Xentry, however, it's a more complicated piece of software, so if you're just interested in diagnostics and maintaining your van, stick to Xentry. If you want to take it to the next level, DTS Monaco it is. It comes in two main versions - 8 and 9. I have both and for my needs, both work perfectly fine and I don't really have a preference between the two. Vediamo is the older version of the coding/engineering software that you probably don't need to consider.
这是对您的货车进行变体编码/工程设计的主要工具(DTS = 诊断和测试系统...🙄)。想要关闭车道保持辅助?DTS 可以做到。想要为您的音频添加平衡功能?DTS 可以做到。以任何速度运行摄像头?DTS 可以做到。还有更多。它也可以像 Xentry 一样诊断和清除代码,但是,它是一个更复杂的软件,所以如果您只是对诊断和维护您的货车感兴趣,请坚持使用 Xentry。如果您想将它提升到一个新的水平,那就是 DTS Monaco。它有两个主要版本 - 8 和 9。我都有这两个版本,而且对于我的需求来说,它们都运行得很好,我对它们没有特别的偏好。Vediamo 是编码/工程软件的旧版本,您可能不需要考虑它。
¶ WIS & EPC (and StarFinder & SDmedia)
WIS is a comprehensive repair manual and information database and it provides information on repair procedures, technical service bulletins, wiring diagrams, and more. Add StarFinder to that mix and it'll show you photos of all the little components of your van and SDmedia if you want full video/animations of how to do stuff (I haven't found much use for either). EPC is part of the same system as WIS and is an online parts catalog. WIS and EPC have a VIN decoder built in, but for newer vans that doesn't seem to work because they're not up-to-date. As an example, my van is a W907 with the 642.899 engine and 722.902 transmission - use that type of information to find your van in WIS. If you need a VIN decoder to help you out, this is a really nice one: https://mb.vin/. This one is okay too: https://mercedesforum.com/forum/vindecoder.php.
WIS 是一个综合性的维修手册和信息数据库,它提供有关维修程序、技术服务公告、接线图等信息。将 StarFinder 添加到其中,它会向您显示您的货车所有小部件的照片,如果您想要完整的视频/动画来了解如何操作,则可以使用 SDmedia(我发现两者都没什么用)。EPC 与 WIS 属于同一个系统,是一个在线零件目录。WIS 和 EPC 内置有 VIN 解码器,但对于较新的货车来说,这似乎不起作用,因为它们不是最新的。例如,我的货车是 W907,配备 642.899 发动机和 722.902 变速箱 - 使用这类信息在 WIS 中找到您的货车。如果您需要 VIN 解码器来帮助您,这是一个非常好的解码器: https://mb.vin/ 。这个也可以: https://mercedesforum.com/forum/vindecoder.php 。
¶ Hardware and software 硬件和软件
The easiest way to get the entire ecosystem is to purchase the whole Mercedes Star Diagnostic Tool suite with all the hardware, multiplexer, software, etc. It's expensive, but it's the best option. Xentry PassThru is also available for an annual fee - if you’re serious about this, that’s the way to go.
获得完整生态系统最简单的方法是购买梅赛德斯之星诊断工具全套套件,包含所有硬件、多路复用器、软件等。虽然价格昂贵,但却是最佳选择。Xentry PassThru 也提供年费订阅——如果您认真考虑,这是最佳选择。
Other options also exist. You can obtain the various software packages as PassThru versions with devices such as the Tactrix OpenPort 2.0. For many (even most), this might be the best option, but I’m not going to go into such systems here, but it’s worth researching if you want to learn more about the whole ecosystem.
还有其他选择。您可以通过 Tactrix OpenPort 2.0 等设备获取各种 PassThru 版本的软件包。对于许多人(甚至大多数人)来说,这可能是最好的选择,但我不会在这里深入讨论这类系统,但如果您想了解更多关于整个生态系统的信息,这值得研究一下。
Here, I will instead focus on the options from VXDIAG (no affiliation - I am merely using this for illustrative purposes). They make various multi-vehicle (including Benz) tools, such as the VCX SE and AllScanner devices and bundle up all the various software on ready-to-go SSDs, HDDs or used laptops - shipping takes about a week. If you are on a newer (2020+) laptop and want to boot from an external harddrive, you will likely need to convert the partition from MBR to GPT, which can be done with e.g., EaseUS. Once done, you can boot from the external hard drive using the loaded SSD and clone it to an internal hard drive, also using EaseUS.
在这里,我将重点介绍 VXDIAG 提供的选项(两者无关 - 我仅以此为例进行说明)。他们生产各种多车型(包括奔驰)工具,例如 VCX SE 和 AllScanner 设备,并将各种软件捆绑在即用型 SSD、HDD 或二手笔记本电脑上 - 运输大约需要一周时间。如果您使用的是较新的(2020 年以后)笔记本电脑,并且想要从外部硬盘启动,则可能需要将分区从 MBR 转换为 GPT,这可以使用 EaseUS 等软件完成。完成后,您可以使用已加载的 SSD 从外部硬盘启动,然后使用 EaseUS 将其克隆到内部硬盘。
¶ Overview of the VXDIAG VCX SE device
¶ VXDIAG VCX SE 设备概述
To use any of the supplied software, you need to connect your PC to your van via the OBD2 port using a “Vehicle Communication Interface”, or hardware VCI. As mentioned above, many different VCI devices can achieve that, but here I’ll focus on the VCX SE device. It is a pretty powerful little thing, which works across different car brands and supports all the main protocols, including DoIP, UDS, and DoNET. It also works with both PassThru and OpenShell (as a multiplexer) versions of Xentry. The device can be connected to your computer via ethernet, wifi, and a supplied USB-C to USB-A cable. All options work about the same, however, to maintain wifi connectivity to a network, I prefer to use the USB-C cable connection. The device comes with no instructions, but it’s pretty intuitive - plug it in, attach the cable to your computer, and then do the rest via software.
要使用任何提供的软件,您需要使用“车辆通信接口”或硬件 VCI 通过 OBD2 端口将您的 PC 连接到您的货车。如上所述,许多不同的 VCI 设备都可以实现这一点,但在这里我将重点介绍 VCX SE 设备。它是一个功能非常强大的小东西,适用于不同的汽车品牌并支持所有主要协议,包括 DoIP、UDS 和 DoNET。它还适用于 Xentry 的 PassThru 和 OpenShell(作为多路复用器)版本。该设备可以通过以太网、WiFi 和提供的 USB-C 转 USB-A 电缆连接到您的计算机。所有选项的工作原理大致相同,但是,为了保持与网络的 WiFi 连接,我更喜欢使用 USB-C 电缆连接。该设备没有说明书,但它非常直观 - 将其插入,将电缆连接到计算机,然后通过软件完成其余操作。

¶ Overview of VXDIAG software
¶ VXDIAG 软件概述
If you get an SSD or used laptop pre-loaded with software from VXDIAG it’ll contain a boatload of stuff, most of which you don’t need. A lot of it will also be in Chinese, so the first thing you want to do is get all of that cleaned up by removing programs you likely don’t need (e.g., chat tools, email clients, browsers, and more). While this is a little daunting, you can ignore most of the software, shortcuts, and icons, because everything is pretty much set up to go and you mostly only need the following software packages:
如果你的固态硬盘或二手笔记本电脑预装了 VXDIAG 的软件,里面会有很多东西,其中大部分你都不需要。很多软件还是中文的,所以你首先要做的就是清理掉所有可能不需要的程序(例如聊天工具、电子邮件客户端、浏览器等等)。虽然这有点棘手,但你可以忽略大部分软件、快捷方式和图标,因为所有东西都设置好了,你通常只需要以下软件包:
- VCX Manager. This is the main software that will control the connection between your van, the VCI, and all downstream software.
VCX 管理器。这是控制您的货车、VCI 和所有下游软件之间连接的主要软件。 - Xentry (Offline). This is the main software for diagnostics.
Xentry(离线)。这是诊断的主要软件。 - Xentry Diagnosis Stop. Xentry is often not able to shut down properly, so you can run this little script to stop the session.
Xentry 诊断停止。Xentry 经常无法正常关闭,因此您可以运行这个小脚本来停止会话。 - DTS Monaco. This is the main software for coding. Version 8 comes pre-installed.
DTS Monaco。这是编码的主要软件。版本 8 已预装。 - WIS, EPC, StarFinder, SDmedia, and other STAR tools. These come pre-installed too and might run via virtualization software. I don’t really use most of these, although WIS and EPC can be helpful.
WIS、EPC、StarFinder、SDmedia 和其他 STAR 工具。这些工具也预装了,可以通过虚拟化软件运行。虽然 WIS 和 EPC 可能有用,但我大部分都不怎么用。
As mentioned above, a lot of unneeded stuff was installed and there are installers all over the place. Since everything is set up ready to go, you can get rid of most/all of that - I transferred installers, etc., to an external hard drive, just in case. For easy access, I dropped the programs I use into the Windows taskbar.
如上所述,安装了很多不需要的东西,安装程序到处都是。既然一切都已设置好,就可以删除大部分/所有安装程序了——为了以防万一,我把安装程序等都转移到了外置硬盘上。为了方便访问,我把常用的程序都放到了 Windows 任务栏里。
¶ How to use VCX Manager
¶ 如何使用 VCX 管理器
This tool is the main software communicating with your VCX SE device (VCI). Note, you don’t need to have the VCI connected to your van for any of this to work (notice the low OBD voltage in the images below). When you turn on your laptop without the VCI connected, you’ll get an error like this popping up:
此工具是与您的 VCX SE 设备 (VCI) 通信的主要软件。请注意,您无需将 VCI 连接到您的货车即可使用此功能(请注意下图中的低 OBD 电压)。如果您在未连接 VCI 的情况下打开笔记本电脑,则会弹出如下错误信息:

You can ignore that. Once you connect the VCI e.g., via the supplied USB cable, you’ll get the following:
你可以忽略它。一旦你通过提供的 USB 线连接 VCI,你将获得以下内容:

You’ll likely also see a “VCI-new” message pop up - minimize that window to the taskbar, but don’t close it. That means the VCX SE is now connected to your computer, so it’s time to open up the VCX Manager. When you do, it’s possible you might see the following at first:
您可能还会看到一条“VCI-new”消息弹出 - 将该窗口最小化到任务栏,但不要关闭它。这意味着 VCX SE 现已连接到您的计算机,现在是时候打开 VCX 管理器了。打开后,您可能会首先看到以下内容:

Wait a minute and your device should show up. If not, press the ReConnect button and you should hear a beep from the VCI. Once everything is connected, you should see this:
稍等片刻,你的设备应该会出现。如果没有,请按下“重新连接”按钮,你会听到 VCI 发出哔声。所有设备连接完成后,你应该会看到以下内容:

Now, it’s time to ensure that all the required VCX software, firmware, licenses, etc. are up-to-date. I’m not really sure what the best sequence of events is here, so in semi-random order:
现在,需要确保所有必需的 VCX 软件、固件、许可证等都是最新的。我不太确定这里的最佳操作顺序,所以按照半随机的顺序:
Update your firmware in the “Device” tab:
在“设备”选项卡中更新您的固件:

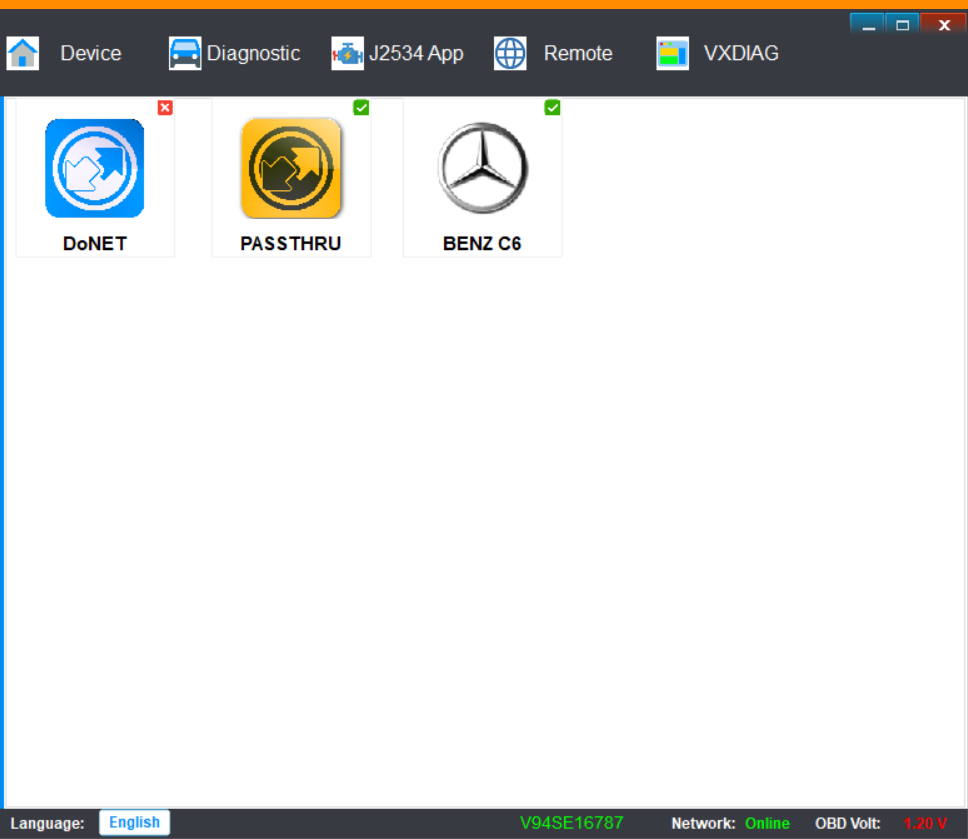
Make sure the correct diagnostic software is installed under the “Diagnostic” tab - you likely want both PassThru (pre-installed) and Benz C6 (likely not pre-installed - click the icon and press install):
确保在“诊断”选项卡下安装了正确的诊断软件 - 您可能需要 PassThru(预装)和 Benz C6(可能未预装 - 单击图标并按安装):
Finally, go back to the “Device” tab and update the licenses. Once done, everything should be ready to go.
最后,返回“设备”选项卡并更新许可证。完成后,一切就绪。

Now, it’s time to head out to your van and plug the VCI into your OBD2 port. Press the Start button twice, without pressing the brake pedal, so the car is on, but the engine isn’t running. To preserve battery, turn off A/C, head unit, etc. With the VCX Manager open and the VCI plugged into your van and the computer, press the “ReConnect” button to make sure everything is connected. If yes, you should be able to see the voltage of your starter battery under the “OBD Volt”, which should read ~12.6V. Is it >13.5V? Turn off that engine, dammit, and try again 😉. Lower than expected? Go drive your van for a bit to recharge the battery (or, alternatively, connect to a trickle charger).
现在,是时候回到你的货车旁,把 VCI 插入 OBD2 端口了。按下启动按钮两次,不要踩刹车,这样汽车就启动了,但发动机没有运转。为了节省电池电量,请关闭空调、主机等。打开 VCX 管理器,将 VCI 插入货车和电脑,按下“重新连接”按钮,确保所有连接都已连接。如果连接正常,你应该能够在“OBD 电压”下方看到启动电池的电压,读数应该在 12.6V 左右。是不是大于 13.5V 了?关掉发动机,再试一次 😉。低于预期?那就开着你的货车出去跑一圈,给电池充充电(或者,连接涓流充电器)。
To make everything work properly, press the “DoIP Switch” under the “Device” tab. Once the window opens, select “BENZ (ISO-13400)” and press the “DoIP ON” button. A “DoIP UDP Send” window should pop up. Press “OK” and minimize the DoIP Config window. You’re now ready to rock and roll!
为了使一切正常工作,请按下“设备”选项卡下的“DoIP 开关”。窗口打开后,选择“BENZ (ISO-13400)”,然后按下“DoIP 开启”按钮。“DoIP UDP 发送”窗口将会弹出。按下“确定”并最小化 DoIP 配置窗口。现在,你就可以开始摇滚啦!
¶ Getting started with Xentry
¶ Xentry 入门
Now the fun begins… The good news is that Xentry is quite easy to use and it’s more straight-forward than many of the OBD2 scanners out there, including those from Foxwell and ThinkDiag - although, as mentioned above, those are fine devices too (I have both. As well as a BlueDriver, OBDLink MX+, OBDeleven, and Carista, which only work as simple OBD2 scanners for Mercedes, but I digress..). In addition to being more user-friendly, it’s also faster, provides helpful diagnostic hints and instructions, and is overall, just much more powerful - as one would expect, since this is the OEM software.
现在有趣的事情开始了……好消息是 Xentry 非常容易使用,而且比市面上的许多 OBD2 扫描仪(包括 Foxwell 和 ThinkDiag 的扫描仪)更直观 - 尽管如上所述,那些也是不错的设备(我都有这两种设备。还有 BlueDriver、OBDLink MX+、OBDeleven 和 Carista,它们只能作为 Mercedes 的简单 OBD2 扫描仪,但我离题了......)。除了更加用户友好之外,它的速度也更快,提供有用的诊断提示和说明,总的来说,功能更强大 - 正如人们所期望的那样,因为这是 OEM 软件。
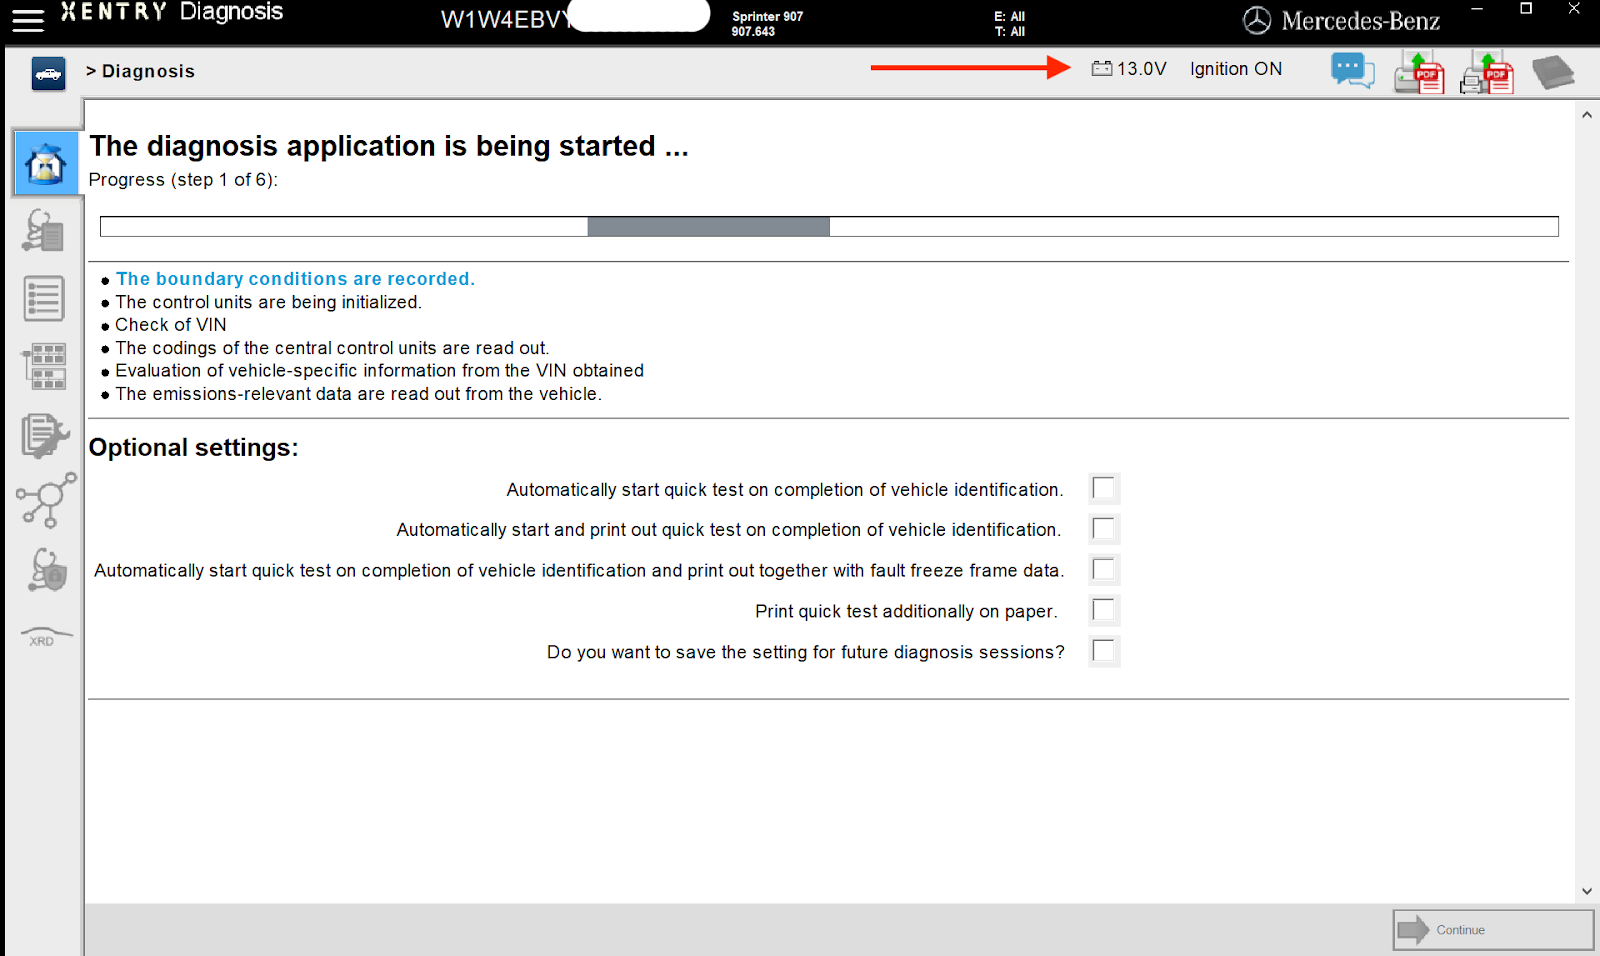
Before you start, make sure everything is connected, the VCI interface is active (check your taskbar), the DoIP switch is on, and the van is on, engine off. Boot up Xentry and it should automatically read your VIN if you’re using an “OpenShell” version. Wait a little and if everything is connected properly, Xentry should read your OBD voltage and status of the ignition:
开始之前,请确保所有设备都已连接,VCI 接口处于活动状态(请查看任务栏),DoIP 开关已打开,车辆已启动,发动机已关闭。启动 Xentry,如果您使用的是“OpenShell”版本,它应该会自动读取您的 VIN。稍等片刻,如果所有设备都连接正确,Xentry 应该会读取您的 OBD 电压和点火状态:
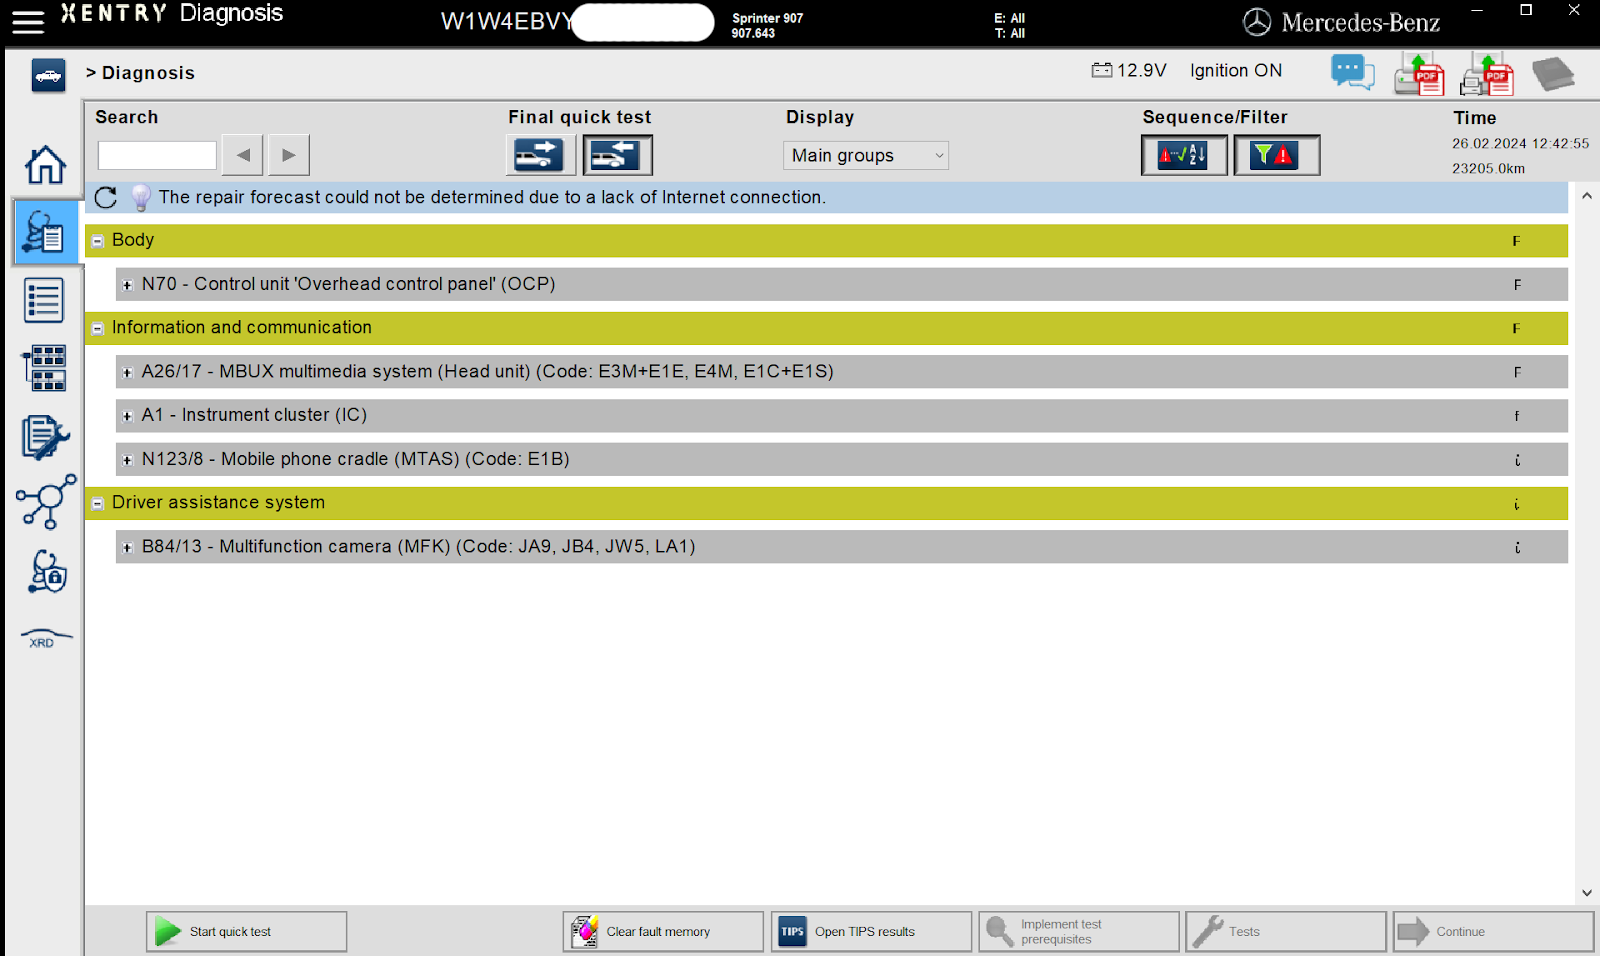
Once initial steps have completed, press the second tab on the left to go to the “diagnostics” portion of Xentry. Run a Quick Test and you will see the program running through all the various components (ECUs) in your van. These will be helpful for DTS Monaco too, so more about that later.
完成初始步骤后,点击左侧第二个选项卡,进入 Xentry 的“诊断”部分。运行“快速测试”,您将看到程序正在运行您车辆的所有组件(ECU)。这些测试对 DTS Monaco 也很有用,稍后会详细介绍。

Once the Quick Test has completed, you’ll get the results, including whatever error codes Xentry might have found. You can use the “Sequence/Filter” to just show error/event codes - otherwise all tested modules will be shown. On the right, you’ll see the following:
快速测试完成后,您将获得结果,包括 Xentry 可能发现的所有错误代码。您可以使用“序列/过滤器”仅显示错误/事件代码 - 否则将显示所有测试模块。在右侧,您将看到以下内容:
F = fault that is stored and current. These can’t be cleared because of an underlying problem.
F = 已存储的当前故障。由于存在潜在问题,此类故障无法清除。
f = older fault that was stored. You can clear these (but note, if the underlying cause is not fixed, they’ll come back).
f = 已存储的旧故障。您可以清除这些故障(但请注意,如果根本原因未得到解决,它们可能会再次出现)。
𝒾 = some sort of “event” has occurred, but it isn’t a fault. This simply means that additional information related to a specific test result is available, but it varies what that information is. Click through and Xentry will tell you. Typically, these can be ignored - for example, during my test it flagged the “Mobile phone cradle”, but that isn’t installed as an option in my van and Xentry, correctly, told me I could ignore the event. Typically (always?) these also cannot be cleared.
𝒾 = 发生了某种“事件”,但并非故障。这仅表示可以获得与特定测试结果相关的附加信息,但具体信息会有所不同。点击后,Xentry 会显示相关信息。通常情况下,这些信息可以忽略 - 例如,在我的测试过程中,它标记了“手机支架”,但我的货车上没有安装该选项,Xentry 正确地告诉我可以忽略该事件。通常(总是如此?)这些信息也无法清除。
✔︎ = test passed without issues.
✔︎ = 测试顺利通过。
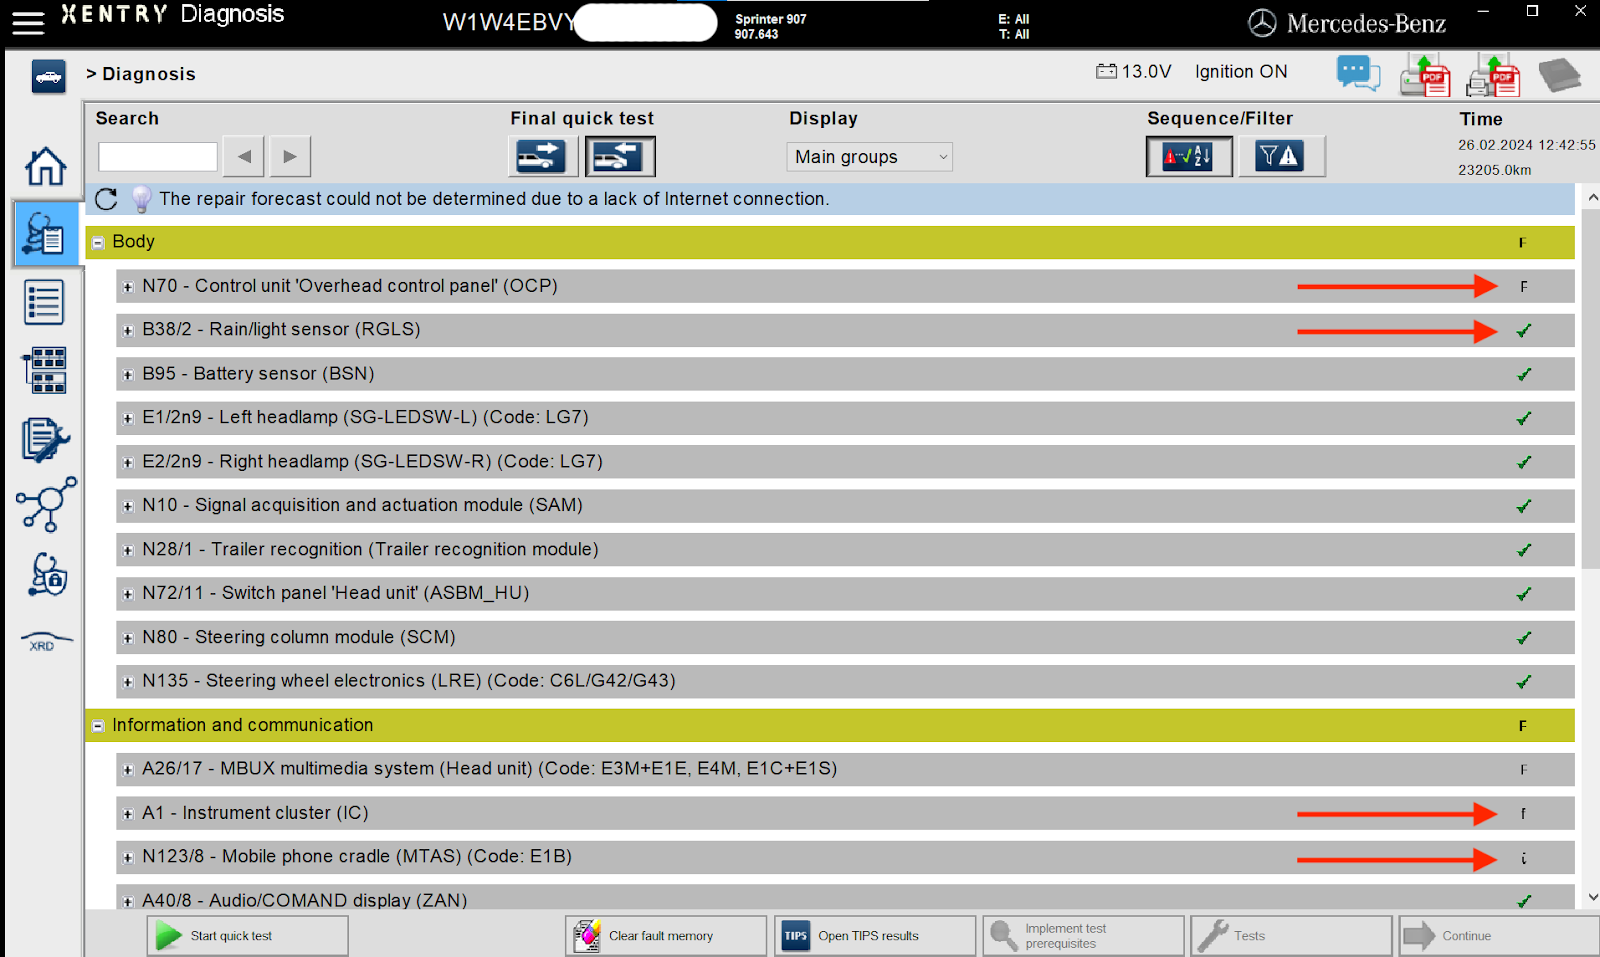
If you double-click a specific module, it will take you through to a screen with much more in-depth information about the fault/event/test, including listing part-codes and the relevant ECU.
如果双击特定模块,它将带您进入一个屏幕,其中包含有关故障/事件/测试的更多深入信息,包括列出零件代码和相关的 ECU。
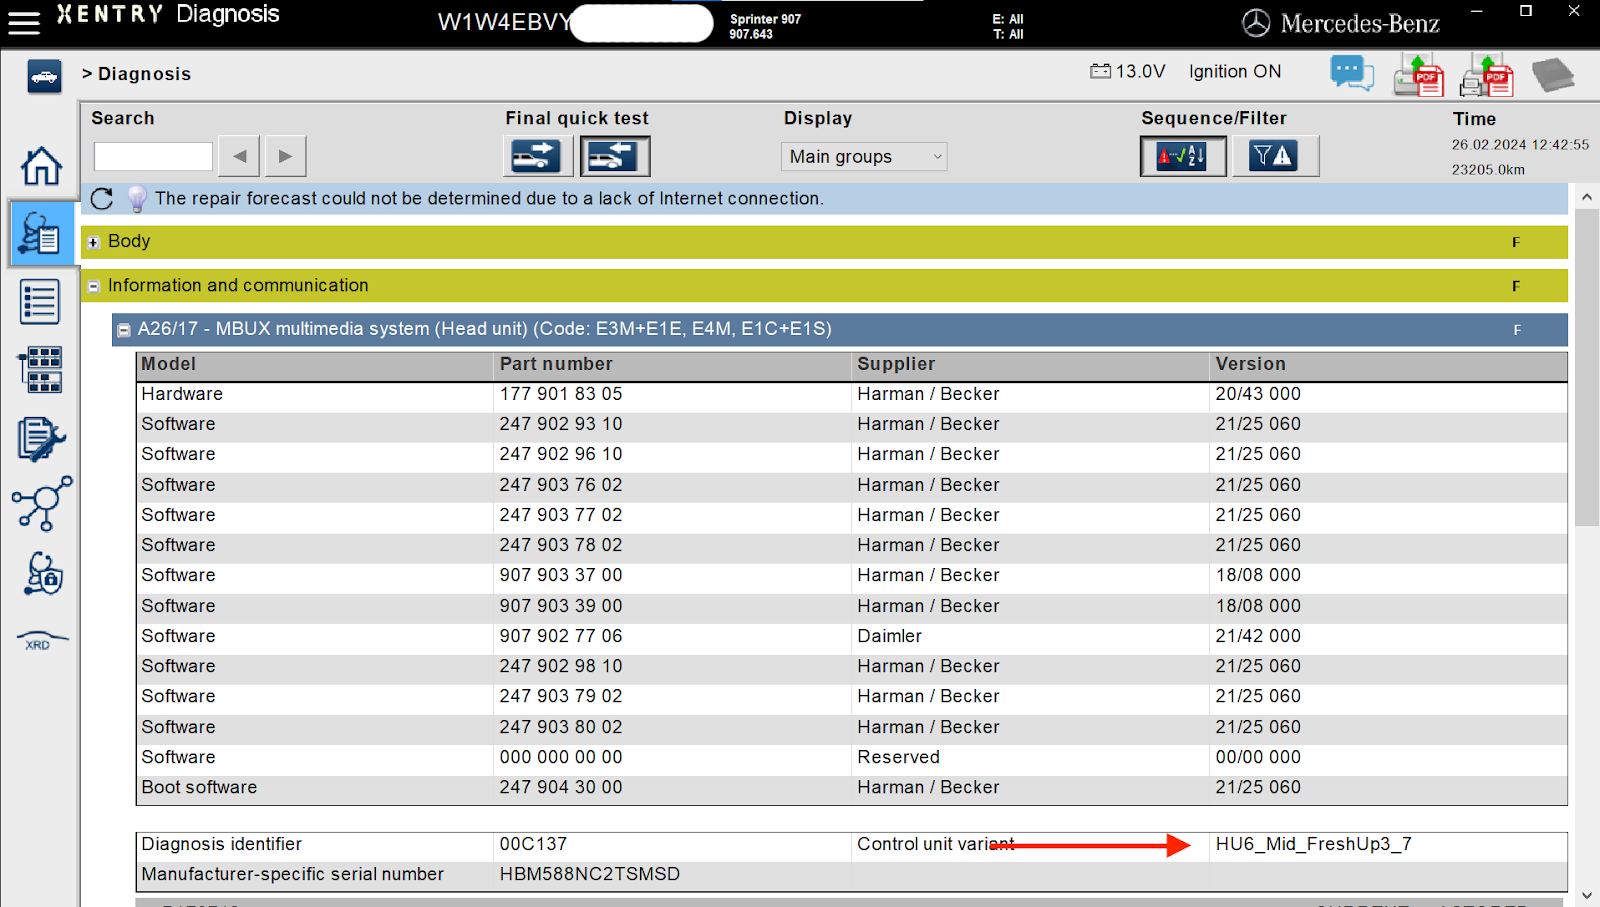
As mentioned above, the ECU information is required for setting up DTS Monaco correctly, so remember to come back to this. In the image below, I clicked through a stored and current fault in my 10” MBUX multimedia system and you’ll see the relevant ECU listed as “HU6_xx”. Note, the screenshot doesn’t actually show the code itself - that’s information underneath that I didn’t grab.
如上所述,正确设置 DTS Monaco 需要 ECU 信息,所以记得再回来查看。在下图中,我点击了我的 10 英寸 MBUX 多媒体系统中已存储的当前故障,您会看到相关的 ECU 被列为“HU6_xx”。请注意,屏幕截图实际上并没有显示代码本身——那是我没抓取到的下方信息。
Once you have gone through and looked at the various codes, go back to the main “Diagnosis” screen where you can clear the codes (DTCs) by pressing the “Clear fault memory” button (see image on previous page). You’ll get the following:
浏览完各种故障代码后,返回“诊断”主界面,按下“清除故障码”按钮(参见上一页图片)即可清除故障代码(DTC)。您将看到以下内容:

If you run a fresh quick test, you’ll see that the stored codes have been cleared:
如果您运行新的快速测试,您将看到存储的代码已被清除:
That’s all I’ll cover for Xentry. There are many other useful functions, but once this is up and running, spend some time familiarizing yourself with the software. Xentry can do much more than simply reading and clearing codes, and you can read out values from your sensors, run adaptations, install new sensors, and more. All of this is well-beyond this simple “getting started” writeup, but note that there’s a difference between “OpenShell” and “PassThru” versions of Xentry as it comes to these functionalities.
关于 Xentry,我就介绍到这里。它还有很多其他实用功能,但一旦启动并运行,请花些时间熟悉一下。Xentry 的功能远不止读取和清除代码,您还可以读取传感器的值、运行适配、安装新传感器等等。所有这些功能都远远超出了这篇简单的“入门”文章的范围,但请注意,“OpenShell”和“PassThru”版本的 Xentry 在这些功能上存在差异。
¶ Getting started with DTS Monaco
¶ DTS Monaco 入门
Once you’re comfortable with Xentry and the larger STAR ecosystem, chances are you’ll want to start fiddling with the various codings and engineering of your van. Before you do, though, remember that this is where things can start to go south if you screw up. That said, it really isn’t as scary as many make it out to be.
熟悉了 Xentry 和更庞大的 STAR 生态系统后,你很可能会开始琢磨你的货车的各种编码和工程设计。不过,在此之前,请记住,如果你搞砸了,事情可能会从这里开始恶化。话虽如此,但这其实并没有很多人想象的那么可怕。
DTS Monaco is a complicated and powerful piece of software that has many of the same functions as Xentry, but also allows you to change the engineering and coding of your van, including enabling you to turn off that pesky (and, frankly, dangerous!) lane keep assist for good! While I managed to get going with Xentry pretty quickly, DTS Monaco took longer, mostly because I didn’t really have a good understanding of what I was even looking at. Let me try to walk you through some of the main aspects of this useful and fun piece of software.
DTS Monaco 是一款复杂而强大的软件,它拥有许多与 Xentry 相同的功能,但还能让你更改货车的工程和编码,包括彻底关闭那个烦人的(坦白说,也很危险!)车道保持辅助!虽然我很快就上手了 Xentry,但 DTS Monaco 却花了更长时间,主要是因为我对所见的内容并没有真正理解。让我试着带你了解一下这款实用又有趣的软件的一些主要方面。
¶ ECUs and SMR-d files in DTS Monaco
¶ DTS Monaco 中的 ECU 和 SMR-d 文件
DTS Monaco connects to your van via many different ECUs that control various functions. For example, your driver’s door has an ECU, your passenger door also has one, so does the MBUX, and on and on it goes. The important thing to understand here is that DTS Monaco needs files that tell the program everything about every single ECU - what it is, what the codings are, etc. This varies depending on exactly what van you have and what options it’s fitted with. For example, for the MBUX in the VS30, if you have the 10” screen, then the ECU is (likely…) “HU6”. If you have the 7” screen, then it’s (likely…) “CONNECT907”.
DTS Monaco 通过控制各种功能的多种 ECU 连接到您的货车。例如,您的驾驶员侧车门、乘客侧车门、MBUX 等等,都配备了 ECU。这里需要理解的重要一点是,DTS Monaco 需要一些文件来告知程序每个 ECU 的所有信息,例如它是什么、编码是什么等等。这取决于您的货车型号和选装配置。例如,对于 VS30 中的 MBUX,如果您使用的是 10 英寸屏幕,那么 ECU(很可能……)是“HU6”。如果您使用的是 7 英寸屏幕,那么 ECU(很可能……)是“CONNECT907”。
For DTS Monaco to connect to these ECUs, it needs to know exactly what ECUs you have - which is where Xentry comes in again. In my van, I have 35 ECUs and I got the name of each ECU by clicking through the various units after running a quick test in Xentry - exactly what I showed a few pages up where I identified the “HU6” ECU as the one responsible for the MBUX system. I went through step by step and wrote down all these names and here’s what I got for my 2022 4x4 with the V6 Diesel:
要让 DTS Monaco 连接到这些 ECU,它需要确切地知道你拥有哪些 ECU——这时 Xentry 又派上用场了。我的货车上有 35 个 ECU,我在 Xentry 中运行了一个快速测试,然后通过点击各个单元获得了每个 ECU 的名称——正如我在前几页中展示的那样,我识别出“HU6”ECU 是负责 MBUX 系统的 ECU。我一步步操作,记下了所有这些名称,以下是我在我的 2022 款 4x4 上搭载 V6 柴油发动机时得到的结果:
ASBM_HU; BCMFA2; CPC_NG; CR61NFZ; DISP6; DMFL222_MOPF; DMFR222_MOPF; DSM222; ESP907; EZS167; FCW177; FSCM_GEN5; HERMES; HLI_FL247; HLI_FR247; HU6; HVAC_F177; HVAC_F907; IBS177; IC907; IMRR177_R1; IMRR177_R3; MMPC213; OHCM907; ORC177; PARKMAN213; SCCM177; SWSP177; TM205; TPMMFA2; UDCM; VCS177; VG907; VGS4NAG2; WMI213MOPF; WMI213MOPFR
The information DTS Monaco needs for each ECU is provided in “SMR-d” files (or, in earlier versions, CBF files, but you can likely ignore these). These can be found in the Xentry package:
DTS Monaco 所需的每个 ECU 信息均包含在“SMR-d”文件中(在早期版本中,则包含 CBF 文件,但您可以忽略这些文件)。这些文件可以在 Xentry 软件包中找到:

Select the ones you need (for my van, that would be the 35 ECUs above), based on the naming, which will be identical between the ECU and the SMR-d file (for example, notice the “HU6” file in the image above). Once they’re all selected, copy (don’t move) them to a new folder e.g., on your desktop.
根据命名选择您需要的 ECU(对于我的货车来说,就是上面的 35 个 ECU)。ECU 和 SMR-d 文件的命名应该相同(例如,请注意上图中的“HU6”文件)。全部选中后,将它们复制(不要移动)到新文件夹,例如桌面文件夹。
¶ Organizing ECU information in DTS Monaco using “Projects”
¶ 使用“项目”在 DTS Monaco 中组织 ECU 信息
Once you have the SMR-d files copied to a separate folder, it’s time to import them into DTS Monaco. The way in which the software is organized is via a set of “Projects”, which is essentially a collection of relevant SMR-d files, and “Workspaces”, which is the actual workspace you will be working in when using the program. Each workspace needs a Project to work. Note, in theory you could import (almost) all SMR-d files into a single Project, but because your van won’t have most of the ECUs linked in those SMR-d files, you wouldn’t be able to connect to the referenced ECUs. Also, the Project file size would be huge and the program slow. Similarly, you also don’t need to import all the SMR-d files into a single Project, but could have individual Projects for working on the MBUX system, the engine, the doors, etc. I prefer having a single Project with all the relevant ECUs though, so that is what I will focus on here.
将 SMR-d 文件复制到单独的文件夹后,就可以将它们导入 DTS Monaco 了。该软件的组织方式是通过一组“项目”(本质上是相关 SMR-d 文件的集合)和“工作区”(您使用该程序时实际工作的工作区)。每个工作区都需要一个项目才能工作。请注意,理论上您可以将(几乎)所有 SMR-d 文件导入单个项目,但由于您的货车不会将这些 SMR-d 文件中链接的大多数 ECU,因此您将无法连接到引用的 ECU。此外,项目文件会非常大,程序运行速度会很慢。同样,您也不需要将所有 SMR-d 文件导入单个项目,但可以使用单独的项目来处理 MBUX 系统、发动机、车门等。不过,我更喜欢将所有相关 ECU 都放在一个项目中,所以我将在这里重点介绍 ECU。
First, let’s boot up DTS Monaco v8:
首先,让我们启动 DTS Monaco v8:


A few things to note here. In the box on the right you’ll see that I have my VCI connected to the computer “VCX (MODULE_xx)”. This is all controlled via “Interfaces”, but more on that later. The “Edit” mode is how we will get our “Workspace” set up, and the “Start” mode is the one we will use to actually run DTS Monaco. More on these later. For now, focus on “Administrate and manage DTS projects”, which is where we will get our SMR-d files imported, and a Project allowing us to connect to all the van’s ECU set up. Click the button and it will start up the System Configurator. In the “Project administration” tab, right click and select “New project”. In the next step, select the “Modular optimized databases” option, which will allow you to import the SMR-d files you previously copied to a new folder.
这里需要注意几点。在右侧的框中,您会看到我的 VCI 已连接到计算机“VCX (MODULE_xx)”。这一切都通过“接口”进行控制,稍后会详细介绍。“编辑”模式用于设置“工作区”,“启动”模式用于实际运行 DTS Monaco。稍后会详细介绍。现在,请关注“管理 DTS 项目”,我们将从中导入 SMR-d 文件,并通过一个项目连接到货车的所有 ECU 设置。单击按钮,它将启动系统配置器。在“项目管理”选项卡中,右键单击并选择“新建项目”。下一步,选择“模块化优化数据库”选项,这将允许您将之前复制的 SMR-d 文件导入到新文件夹中。

In the following example, I only selected three SMR-d files to keep it simple, however, for the Project I use with my van, I selected all 35 mentioned above. Remember, these are the SMR-d files you previously copied into a new folder from the “MB_VAN/SMRX” subfolder in the Xentry folder (see above).
在下面的示例中,为了简单起见,我只选择了三个 SMR-d 文件。但是,对于我的货车项目,我选择了上面提到的全部 35 个文件。请记住,这些 SMR-d 文件是您之前从 Xentry 文件夹中的“MB_VAN/SMRX”子文件夹复制到新文件夹中的。(参见上文)。

Next, name your Project and click through to create it. I named mine “W907” to reflect the van ID. That’s it.
接下来,命名你的项目并点击创建。我将我的项目命名为“W907”,以反映货车的 ID。就这样。


Once you’re back to the “Project administration” tab, you can see all the details about your new Project, including information about the imported SMR-d files, etc.
返回“项目管理”选项卡后,您可以看到有关新项目的所有详细信息,包括有关导入的 SMR-d 文件的信息等。

Once you have successfully created a Project, it’s on to creating a workspace. Note, in the above I created Projects from scratch. It is possible that a Project already exists within the DTS Monaco installation for your van, in which case you can just use that, instead of having to go through the steps of identifying ECUs, copying files, etc. For my van, there wasn’t a relevant Project already, plus, I wanted to figure out how this all works.
成功创建项目后,接下来就是创建工作区。请注意,上面我是从零开始创建的。您的货车的 DTS Monaco 安装中可能已经存在一个项目,在这种情况下,您可以直接使用该项目,而无需执行识别 ECU、复制文件等步骤。我的货车还没有相关的项目,而且,我想弄清楚这一切是如何运作的。
¶ Creating “Workspaces” in DTS Monaco
¶ 在 DTS Monaco 中创建“工作区”
Once you have set up a relevant Project, it’s time to create a Workspace so you can start working on your van in DTS Monaco. Remember, Projects are a collection of imported SMR-d files that tells DTS Monaco how to communicate with the various ECUs, whereas Workspaces simply create a set of interfaces that allows you to perform various coding, diagnostic, and engineering tasks on your van.
设置好相关项目后,就可以创建工作区,以便在 DTS Monaco 中开始处理您的货车了。请记住,项目是导入的 SMR-d 文件的集合,这些文件指示 DTS Monaco 如何与各种 ECU 通信,而工作区只是创建一组接口,允许您在货车上执行各种编码、诊断和工程任务。
Go back to the main page of DTS Monaco and under the “Edit” mode, click the “Create a new workspace” button. DTS Monaco has several templates already built-in and we’re simply going to use one of those to get set up. Once set up, you can edit various aspects of your Workspace within DTS Monaco itself.
返回 DTS Monaco 主页,在“编辑”模式下,点击“创建新工作区”按钮。DTS Monaco 已内置多个模板,我们将使用其中一个进行设置。设置完成后,您可以在 DTS Monaco 中编辑工作区的各个方面。

Select the Project you just created and the relevant template. Press “OK”. The main DTS Monaco program will open and as is always the case when you open up the program, it’ll ask you if you want to “Perform an ECU update”. Press “No” (don’t worry if you accidentally press “Yes” - it won’t actually work).
选择您刚刚创建的项目和相关模板。点击“确定”。DTS Monaco 主程序将会打开,与往常一样,它会询问您是否要“执行 ECU 更新”。点击“否”(如果您不小心按了“是”,也不用担心——它实际上不会起作用)。

Welcome to DTS Monaco! Once inside the program, press “Save” and give your Workspace a name:
欢迎使用 DTS Monaco!进入程序后,点击“保存”并为您的工作区命名:

You’re now ready to start working on your van. But first, you need to make sure interfaces are connected.
现在您可以开始修理您的货车了。但首先,您需要确保接口已连接。
¶ Checking Interfaces in DTS Monaco
¶ 检查 DTS Monaco 中的接口
To ensure that DTS Monaco can correctly communicate with your van, you need to make sure that your VCI has been set up correctly. In all likelihood, you don’t need to go through this, but in case you do. From the main screen of DTS Monaco, click the “Administrate and manage DTS projects” button again. This time, head over to “System settings”, where you will see the “Interfaces”. From here, click through to the various modules and make sure your VCI is listed. If you are using the VCX SE, then you need to have the following details, which will likely be similar / the same for other VCIs too:
为了确保 DTS Monaco 能够与您的货车正确通信,您需要确保您的 VCI 已正确设置。您很可能不需要执行此操作,但万一需要的话,请再次执行此操作。在 DTS Monaco 的主屏幕上,再次点击“管理 DTS 项目”按钮。这次,转到“系统设置”,您将看到“接口”。从这里,点击各个模块,并确保您的 VCI 已列出。如果您使用的是 VCX SE,则需要以下详细信息,其他 VCI 的相关信息可能也类似/相同:
The “tick” box is the currently active interface that’s being used (“VCI_SMR” in my case). Note, there’s also a “Simulation” module, which will allow you to start up DTS Monaco, play around with things, etc., without the need for an actual VCI to be connected. If you right-click on the left-hand side, you’ll see a menu to update your VCI information, allowing you to see what is currently connected to your computer and what is not. In my case, that would be “VCI_SMR, “VCX”, and “Simulation”. The latter will always be shown as connected, since it doesn’t need actual hardware, and the reason why my computer is showing both VCI_SMR and VCX, despite me only having the VCX SE connected, is because those two have identical information. DTS Monaco can only have one VCI connected at a time, so none of this is a problem - I simply created a duplicate for the purpose of writing this guide.
打勾的方框代表当前正在使用的活动接口(在我的情况下是“VCI_SMR”)。请注意,还有一个“模拟”模块,它允许您启动 DTS Monaco、进行各种操作等,而无需连接实际的 VCI。如果您在左侧点击鼠标右键,您将看到一个菜单来更新您的 VCI 信息,让您可以查看当前连接到计算机的设备和未连接的设备。在我的情况下,这三个设备分别是“VCI_SMR”、“VCX”和“模拟”。后者将始终显示为已连接,因为它不需要实际的硬件。尽管我只连接了 VCX SE,但我的计算机却同时显示 VCI_SMR 和 VCX,这是因为这两者的信息相同。DTS Monaco 一次只能连接一个 VCI,所以这些都不是问题——我只是为了编写本指南而创建了一个副本。
In the “Interfaces CBF” tab, also make sure that the “eCOM_CBF” interface has been ticked off:
在“Interfaces CBF”选项卡中,还要确保“eCOM_CBF”接口已被勾选:

Once all of this has been done, you are ready to get coding in DTS Monaco itself. Get excited!
完成所有这些操作后,您就可以在 DTS Monaco 中开始编码了。兴奋吧!
¶ Working in DTS Monaco
¶ 在 DTS Monaco 工作
With everything set up, you are now ready to start working on your van. Remember, you are now going to be fiddling with the brain(s?) of the van itself, so you do run the risk of messing things up. I have heard claims that you may be able to brick your van when you do variant coding, however, I’m not really sure that’s true for most things. But as a precaution, keep all of this in mind and carefully document your own steps, including backing up coding files. You can upload entirely new ECU software and perform flashes in DTS Monaco, and I’m sure if those things go wrong, you can badly mess up your car, however, presumably a reflash back to stock can reverse the process. I won’t cover any of that here, since I haven’t done any of that in DTS Monaco, although I have used KessV2 to install the absolutely fantastic Kerma tune - but only via their direct help and instructions.
一切就绪后,您就可以开始修理您的面包车了。请记住,您现在要摆弄面包车本身的“大脑”,因此您确实有把事情搞砸的风险。我听说,当您进行变体编码时,您可能会让您的面包车变成砖头,但是,我不确定这在大多数情况下是否属实。但作为预防措施,请记住所有这些并仔细记录您自己的步骤,包括备份编码文件 。您可以上传全新的 ECU 软件并在 DTS Monaco 中执行刷新,我敢肯定,如果这些事情出错,您的车可能会被严重弄坏,但是,大概重新刷新到库存可以逆转该过程。我不会在这里介绍任何这些内容,因为我没有在 DTS Monaco 中做过任何这些事情,尽管我使用 KessV2 安装了绝对出色的 Kerma 调谐 - 但只是通过他们的直接帮助和说明。

In the main DTS Monaco window, click the “Open a workspace” button and select the Workspace you just created. In the following, I’ll be using the Workspace I have been using for my van.
在 DTS Monaco 主窗口中,点击“打开工作区”按钮,然后选择您刚刚创建的工作区。接下来,我将使用我的货车上一直使用的工作区。
As per normal, it will ask you if you want to do an ECU update. Press NO. Wait for the program to load and you should now see your Workspace in DTS Monaco in all its glory. Remember those SMR-d files you imported as part of creating your Project? Those are the “Logical Links” on the left. Note, several versions are available because there are different interfaces that can connect - only the connected ones will work and be active. In the example below, you’ll see me having highlighted the “HU6” ECU that controls the MBUX.
按照惯例,它会询问您是否要进行 ECU 更新。选择“否”。等待程序加载,您现在应该可以看到 DTS Monaco 中工作区的完整界面。还记得您在创建项目时导入的 SMR-d 文件吗?它们就是左侧的“逻辑链接”。请注意,由于可以连接的接口不同,因此有多个版本可用——只有已连接的接口才能工作并处于活动状态。在下面的示例中,您会看到我突出显示了控制 MBUX 的“HU6”ECU。

¶ Defeating the firewall(s)
¶ 突破防火墙
Before you can start doing any variant coding in DTS Monaco you need to defeat a firewall. Softing, who created DTS Monaco, presumably put these in place to ensure that only Real Professionals can work on your van. Right.
在 DTS Monaco 中开始进行任何变体编码之前,你需要先绕过防火墙。DTS Monaco 的开发者 Softing 大概设置了防火墙,以确保只有真正的专业人士才能操作你的货车。没错。
What firewalls are in place varies based on model year, etc. For my W907, I can open up the firewall via the EZS167 ECU, but before I show you how to do that, let’s first log into the BCMFA2 ECU, since that’s the way to open up the firewall in older vans. In the list of logical links, right-click on EZS167 and select “New Tab for Logical Link”. When you do this, you keep the link to that ECU open and you can have multiple ECUs open at the same time. In contrast, if you were to click through to this ECU via one of the tabs on top, you’d lose the connection once you click through to another one where you might want to do some coding. By having a single tab just for this ECU, you can ensure the connection is kept alive throughout your session.
防火墙的具体情况因车型年份等因素而异。对于我的 W907,我可以通过 EZS167 ECU 打开防火墙,但在向您展示如何操作之前,让我们先登录 BCMFA2 ECU,因为这是在老式货车中打开防火墙的方法。在逻辑链接列表中,右键单击 EZS167 并选择“逻辑链接的新选项卡”。执行此操作时,您可以保持到该 ECU 的链接打开,并且可以同时打开多个 ECU。相反,如果您通过顶部的一个选项卡点击进入此 ECU,那么一旦您点击进入另一个您可能想要进行一些编码的选项卡,就会丢失连接。通过为此 ECU 设置一个选项卡,您可以确保在整个会话过程中保持连接处于活动状态。

Once that link is created, a new tab will open. In the new tab, go to “Generic Jobs” and select “Security Access Level 37”. Press the “Transmit” button and you should see a bunch of text in the window below. Provided that you see no text in red, in an older van, you should now have turned off the firewall.
创建链接后,会打开一个新标签页。在新标签页中,前往“通用作业”,并选择“安全访问级别 37”。点击“传输”按钮,你会在下面的窗口中看到一堆文本。如果你没有看到红色的文字,那么在老款货车上,你应该已经关闭了防火墙。

In a newer van, however, the process is a little different and, as mentioned above, done via the EZS167 ECU instead. Do the same process as described above, but this time it’s “Security Access Level 3B”.
然而,在较新的货车中,流程略有不同,如上所述,是通过 EZS167 ECU 完成的。请按照上述步骤操作,但这次是“安全访问级别 3B”。

Click “Transmit” and provided that you see no red text and have “acknowledged” displayed under “Response State”, your firewall should now be deactivated.
单击“传输”,如果您没有看到红色文本并且在“响应状态”下显示“已确认”,则您的防火墙现在应该被停用。
¶ Variant coding 变体编码
Now, it is time to perform the actual variant coding. Open up the relevant ECU governing the features you want to change and open it in a new tab. In the example here, we open the MBUX’s “HU6” ECU. Once done, you first want to select the “Extended Start”and press Transmit in the new ECU tab you opened up:
现在,是时候执行实际的变体编码了。打开控制您想要更改的功能的相关 ECU,并在新选项卡中打开它。在本例中,我们打开 MBUX 的“HU6”ECU。完成后,首先要在打开的新 ECU 选项卡中选择“扩展启动”,然后按下“传输”按钮:

Provided that you correctly disabled your firewall and still have the relevant ECU (EZS167 and/or BCMFA2) open in a tab, you should see another “acknowledged'' Response State. The ECU is now ready for coding.
假设您已正确禁用防火墙,并且仍在选项卡中打开相关的 ECU(EZS167 和/或 BCMFA2),您应该会看到另一个“已确认”的响应状态。ECU 现在可以进行编码了。
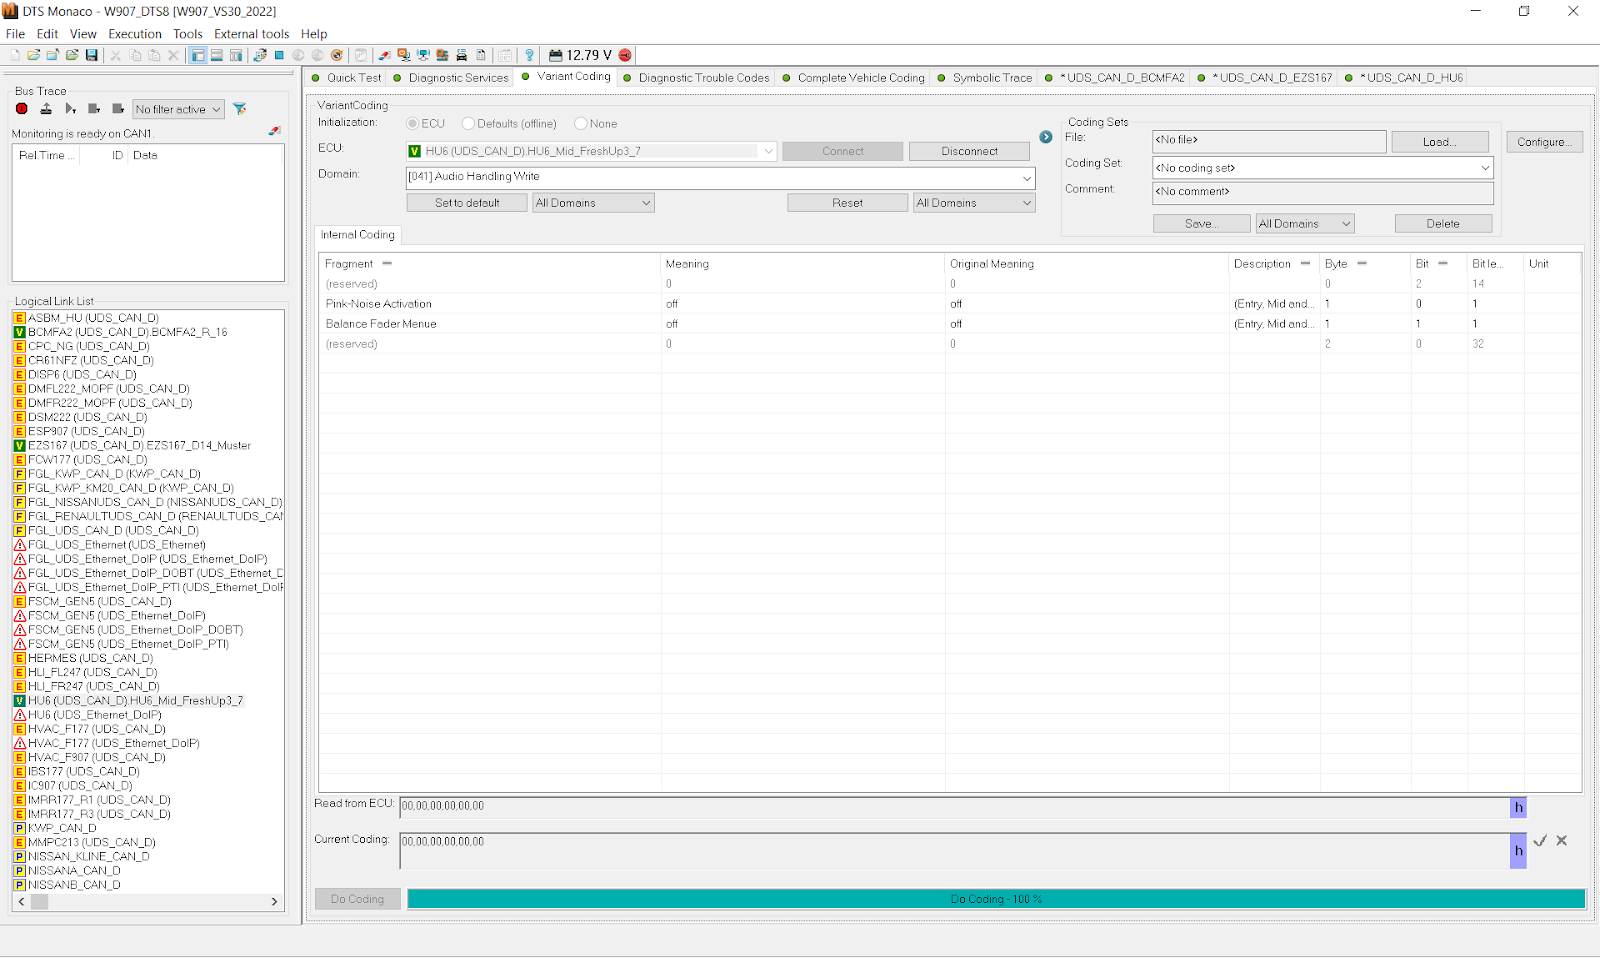
Go to the “Variant Coding” tab and select your ECU. It should connect - if not, press “Connect”. Underneath the ECU you will see the “Domain” list. This is where the functions of the ECU can be accessed and is where you will actually find the values to change. In the example below I select “Audio Handle Write” to add a fader and balance to the MBUX (well, I already had it set to “ON”, so in this example I turn it back “OFF”):
前往“变量编码”选项卡,选择您的 ECU。它应该可以连接——如果没有,请按“连接”。在 ECU 下方,您将看到“域”列表。在这里可以访问 ECU 的功能,并且您可以在这里找到需要更改的值。在下面的示例中,我选择“音频处理写入”来为 MBUX 添加推子和平衡 (嗯,我已经将其设置为“开启”,因此在本例中我将其恢复为“关闭”):

Find the relevant feature in the “Fragment” column - here, “Balance Fader Menue”. Double-click the value under “Meaning” (this is what you’ll change it to) and a dropdown menu will open up - select the new value you want. The original (or, rather, current) value is under “Original Meaning”:
在“片段”列中找到相关功能——这里是“平衡推子菜单”。双击“含义”下的值(这就是您要更改的值),将打开一个下拉菜单——选择您想要的新值。原始值(或者说当前值)位于“原始含义”下:

Also, notice the binary coding string under “Read from ECU” (what the ECU is currently coded for) and “Current Coding” (what you just selected). Once everything looks good, press the “Do Coding”. Provided that you have done all previous steps correctly, you should see no pop-ups and the bar next to “Do Coding” go to 100% and the new value presented under the “Meaning” column and Current Coding == Read from ECU.
另外,请注意“从 ECU 读取”(ECU 当前编码)和“当前编码”(您刚刚选择的编码)下的二进制编码字符串。一切正常后,点击“执行编码”。如果您正确完成了所有上述步骤,则应该不会出现任何弹出窗口,“执行编码”旁边的进度条会达到 100%,新值会显示在“含义”列下,并且“当前编码”==从 ECU 读取。
IF you get a pop-up, Google the error code - something went wrong in previous steps. I would suggest restarting the session again. Did you turn off the firewall? Turn on Extended Start? Those ECUs still connected?
如果弹出错误提示,请在 Google 上搜索错误代码 - 之前的步骤出了问题。我建议你重启一下会话。你关闭了防火墙吗?打开了扩展启动吗?那些 ECU 还连接着吗?
Provided that everything went as expected, your ECU should now have the new values. HOWEVER, they haven’t actually transferred yet, so you need to go through a few additional hoops. Last step.
如果一切顺利,您的 ECU 现在应该已经拥有了新的值。然而,这些值实际上还没有迁移,所以您还需要完成一些额外的步骤。最后一步。
¶ Making new variant coding values permanent
¶ 使新的变体编码值永久化
In older vans, a “Hard Reset” of your ECU should be sufficient to make your coding changes permanent, however, for newer vans, you need to go through a few more steps, so let’s do that first.
在较旧的货车中,对 ECU 进行“硬重置”应该足以使您的编码更改永久生效,但是,对于较新的货车,您需要执行更多步骤,所以让我们先这样做。
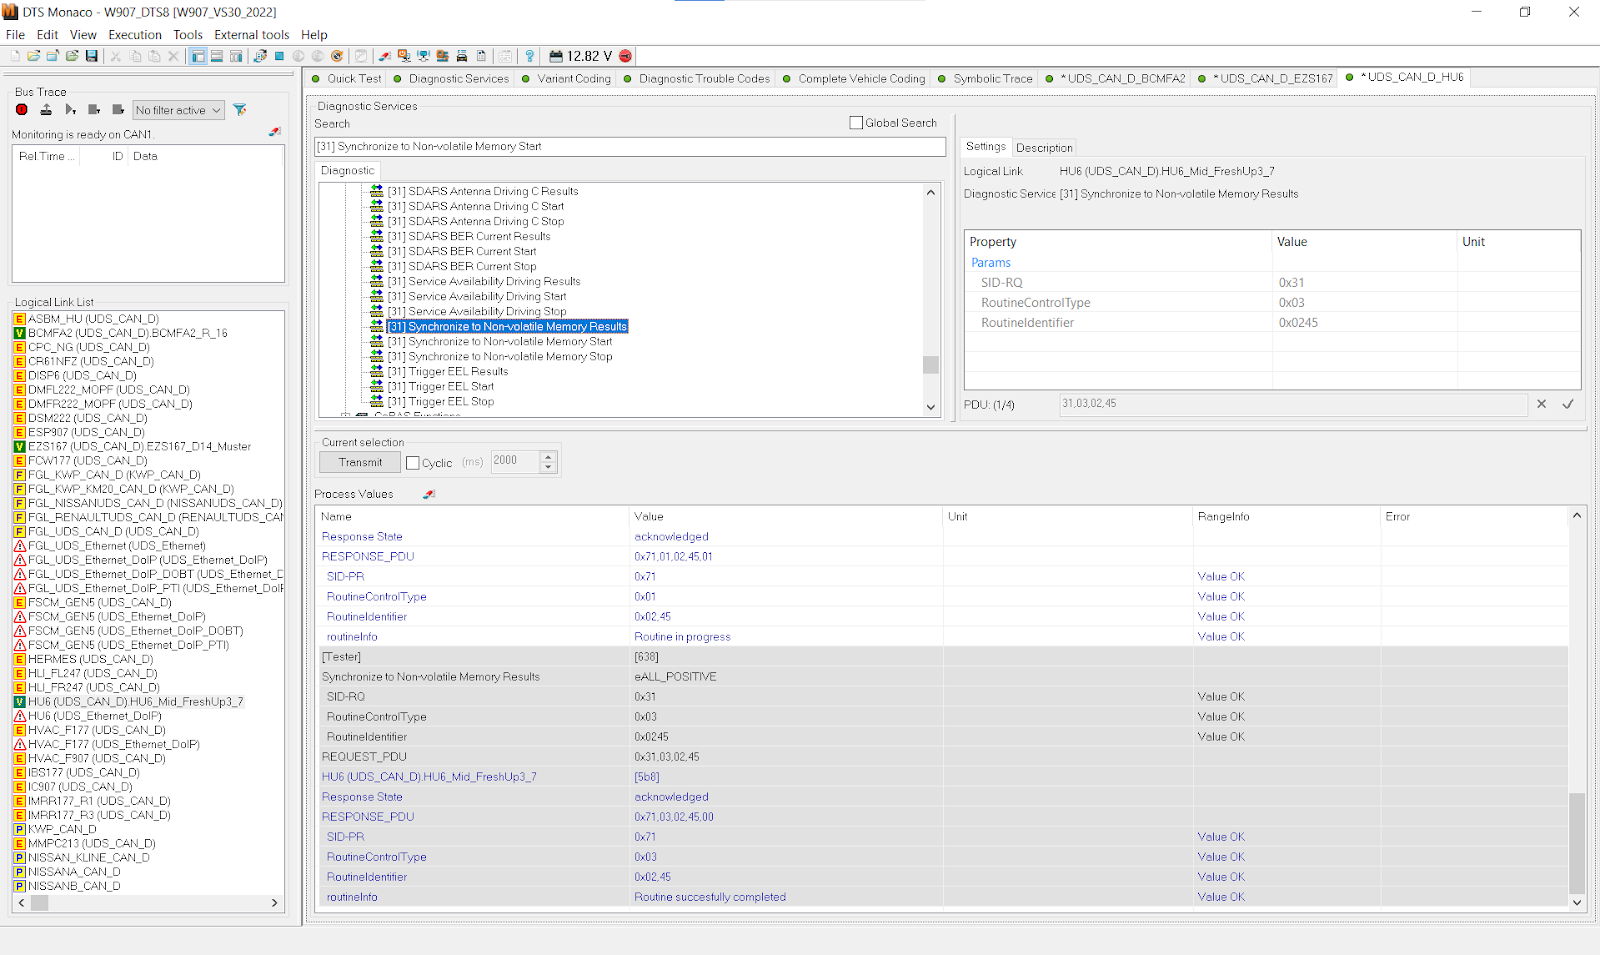
Click back to the open tab with the ECU you just changed variant coding for. In the “Diagnostic Services” search box, first find the “[31] Synchronize to Non-volatile Memory Start”. Click Transmit, and provided everything upstream was done correctly, you should get an “acknowledged” Response State and no red text.
点击返回刚刚更改变体编码的 ECU 的打开选项卡。在“诊断服务”搜索框中,首先找到“[31] 同步到非易失性内存启动”。点击“传输”,如果所有上游操作都正确完成,您应该会得到“已确认”的响应状态,并且没有红色文本。

Next, click “[31] Synchronize to Non-volatile Memory Results”, followed by Transmit. Again, you should get an “acknowledged” Response State.
接下来,点击“[31] 同步到非易失性内存结果”,然后点击“传输”。再次,您应该会得到“已确认”的响应状态。
Now, it’s time to perform the Hard Reset of your ECU:
现在,是时候对你的 ECU 进行硬重置了:

Do a Hail Mary, turn off the van, open the driver’s door, wait a few minutes, do another Hail Mary, and provided that your van did blow up in flames, the changes should now be permanent! You can check that by turning on the van (engine off), logging into the relevant ECU and then checking - here, you’ll see my “Balance Fader Menue” is once again “off”.
先采取“万福玛利亚”式的措施,关掉货车,打开驾驶室车门,等几分钟,再采取“万福玛利亚”式的措施,如果你的货车真的起火了,这些变化现在应该是永久性的了!你可以先启动货车(发动机关闭),登录相关的 ECU,然后检查——在这里,你会看到我的“平衡推子菜单”再次“关闭”。

¶ Useful posts on specific variant codings
¶ 关于特定变体编码的有用帖子
As mentioned above, DTS Monaco is much more powerful than just variant coding, however, I think that is probably what most people will be using it for, so that has been my focus in this guide. What variants should you code and what features should you turn on and off? Well, that’s up to you - Google (and this forum) being your friends 😉. Below, a few links to get you started:
如上所述,DTS Monaco 的功能远不止变体编码,但我认为这很可能是大多数人使用它的目的,因此本指南的重点也在于此。您应该编码哪些变体,应该启用和禁用哪些功能?这取决于您——Google(以及本论坛)是您的朋友😉。以下是一些入门链接:
Enable Fader and Balance menu
启用推子和平衡菜单
https://sprinter-source.com/forums/index.php?threads/114180/
Enable Automatic Folding Mirrors on lock/unlock
锁定/解锁时启用自动折叠后视镜
https://sprinter-source.com/forums/index.php?threads/116146/
Disable Lane Keep Assist
禁用车道保持辅助
https://sprinter-source.com/forums/index.php?threads/108445/
¶ 附件
If you prefer a PDF version of this guide, I have attached it here. I might update it, in which case I'll create a new reply to this thread and attach an updated PDF.
如果您想要本指南的 PDF 版本,我已将其附加在此处。我可能会更新它,届时我会在此主题下创建一个新的回复,并附上更新后的 PDF 版本。
https://sprinter-source.com/forums/index.php?attachments/293947/